MyLINK Email API – Product Guide
The MyLINK Email API is a robust, secure, and scalable messaging product that enables developers to send and manage Email communications directly through LINK Mobility’s infrastructure. This guide will walk you through how to configure and monitor your Email API usage from the MyLINK Portal. For information regarding the API configuration, refer to API Reference.
Overview
The Email API is ideal for businesses requiring:
Reliable delivery of one-way Email messages.
Centralized control of credentials.
Insightful dashboards for traffic monitoring and log analysis.
Secure access management through the MyLINK Portal.
All actions can be performed within the MyLINK Portal, without the need to contact support, unless otherwise noted.
Create and Manage API Credentials
Before sending messages via the Email API, you must create API credentials tied to a specific account.
How to create credentials:
Navigate to Email API Product in the MyLINK Portal.
Click Create Credentials.
Add the name of the credentials.
A client ID and client secret will be generated — store them securely.
Additional credential management features:
Regenerate client secrets
Deactivate credentials
Dashboard Overview
The MyLINK Email Dashboard provides a comprehensive, real-time view of your messaging activity. It is designed to help you track delivery success, identify performance trends, and monitor key statistics related to your Email traffic.
Whether you're managing large campaigns or day-to-day transactional messaging, the dashboard offers full visibility into outbound (MT) Email flows.
Metrics available:
Total messages sent
Delivery status breakdown (Delivery success, Delivery Failure, In Process)
Delivery failure breakdown (error status displayed)
Use the built-in date range filter to analyze trends over time — up to 90 days.
Overview of Dashboard Components
1. Top-Level Summary Widgets
At the top of the dashboard, you’ll find summary boxes displaying the most important KPIs at a glance:
Messages Sent – Total Emails messages submitted.
Messages Delivered – Number of messages successfully delivered to recipients.
Open Rate – Number of open emails vs number of sent messages.
Click Rate – Number of clicked vs number of sent messages.
Reputation — Email sending reputation for the selected period (weighted by complaints, bounces, spam, and engagement).
2. Traffic Breakdown Charts
These visual elements help you understand delivery trends and campaign impact over time.
Volume Over Time
A time-series chart that shows how your traffic evolved. Useful for identifying spikes or delivery issues.Status Distribution
Visualize the ratio of Delivered vs Failed vs In Progress messages.Delivery over time
Visualizes the volume of successfully delivered messages over a selected time range.Failures over time
Displays failed message attempts across time.
3. Filtering & Customization
To help you drill down into specific data, a full set of filters is available across the dashboard:
Date Range
Select from predefined ranges or custom periods.Sender Name
Filter results by specific alphanumeric sender or shortcode.Ref ID
Filter data by a specific message reference ID.Template
Filter results by the email template used.
Export Options
You can export all dashboard metrics and charts as a CSV file using the Export button at the top right. This enables further offline analysis or reporting.
Message Logs Overview
The Logs section provides detailed visibility into every email sent through the MyLINK Email API. It supports tracking, troubleshooting, and verification by offering message-level transparency across your email operations.
Each log entry includes when the email was sent, who the sender and recipient were, and what delivery status it received.
Key Features of the Logs Interface
1. Search and Filtering
Quickly narrow down results using a variety of filters:
Date and time range
Sender email or recipient address
Message status (Delivered, Failed, Bounced, Queued, etc.)
Credential or user
Recipient: Filter data by recipient email address.
Message ID: Filter by a specific message identifier.
Ref ID: Filter data by a specific message reference ID.
Template: Filter results by the email template used.
Filters can be combined to investigate specific events, diagnose delivery issues, or audit campaigns.
2. Table View
Each row in the table represents an individual email message with core details:
Timestamp of the event (in UTC or local time)
Sender and recipient email addresses
Message ID
Delivery status and final result
Channel: always Email in this context
User and credential information
Clicking a row opens the Message Details panel, which includes a full status timeline, message metadata, and headers (when available).
3. Export to CSV
You can export your filtered logs using the Export button.
What’s included:
All visible log fields
Only the data matching your current filters
Downloadable in .csv format for use in Excel or Google Sheets
Notes:
Exports may be limited in size for performance reasons.
Media or file attachments are not included.
Larger exports can be handled via API or through a support request if needed.
Delivery Reports (DLRs)
The DLRs View provides a focused list of all delivery report events sent to your configured callbacks, helping you confirm delivery status at scale.
DLRs are essential for confirming whether a message was delivered, buffered, failed, or expired.
Details on DLR codes can be seen in the API Reference.
Features
View per-message delivery events
Filter by:
Date/time
Delivery status
Recipient number
Check callback status codes (e.g., 200 OK, 400 error)
See retry attempts and failures
This helps technical teams debug delivery or endpoint issues quickly.
Template Management
The Templates section allows users to create, manage, and publish email templates directly from the portal. These templates are used when sending messages via the MyLINK Email API and are account-specific — meaning users only see templates for the account they’re logged into.
Templates Overview
Located in the side menu under Templates, this section includes:
Templates overview
A list of all existing email templates, presented in a table format.Create template
Opens the email template editor to design a new message.
The table includes the following columns:
Name
Status (Draft / Published)
ID (copyable)
Channel
Tags
Creation and last modified date
Actions (Edit, Duplicate, Delete, Publish/Draft toggle)
Users can:
Search templates by name, content, or ID
Filter by tags
Sort templates by name, creation/modification date, or status
Customize visible columns (except for Actions, which is always shown)
Pagination is enabled when there are more than 10 templates. Rows expand to show all tags when needed.
Template Actions
From the Actions column, users can:
Edit: Opens the template in the visual editor
Duplicate: Opens a modal to rename and duplicate the selected template
Delete: Prompts a confirmation modal
Move to Draft / Publish: Toggle between publishable and draft state
Template Editor
Clicking Create template or Edit opens the visual editor (powered by a third-party tool) with a toolbar at the top:
Name field (editable, with uniqueness warnings)
Tags field (add, remove, or create new tags)
Send Preview button
Publish & Exit or Save as Draft & Exit
Templates are not autosaved as you work. If a user attempts to leave the page without saving, a confirmation popup will appear — only if changes were made.
You can also:
Send a preview to a test email address
Monitor saving status via a spinner and “Saved” label
Manage template versions collaboratively (last saved version is preserved)
Domain Configuration
The Domain Configuration section allows users to configure and verify sender domains for use with the Email API. This setup is required to ensure message deliverability and compliance with sender authentication standards.
Domain Table
Accessible from the Email API navigation, this page displays a list of configured domains, including:
Domain name
DNS verification status
SPF and DKIM validation status
Last updated time
Status (Active, Pending)
Users can add a new domain by clicking Add Domain, which opens a modal where they input the domain name. The system then provides DNS records to be added (TXT for SPF, CNAME or TXT for DKIM).
Verification Process
Once the domain is added:
The user receives DNS configuration instructions.
After DNS is updated, the portal automatically checks the status.
Verification status is shown as:
Verified
Pending
Error (with tooltip guidance)
Only verified domains can be used as sender addresses in email messages sent via the API.
Allowed Senders
Users can also manage Allowed Senders, which define specific sender email addresses permitted to send messages when a verified domain is not configured.
Up to 5 allowed senders can be added.
If no allowed senders are configured, sending is not limited by address.
SPF, DKIM, DMARC and Return-Path
To achieve reliable email delivery through the MyLINK Email API, your sending domain must be configured with the appropriate DNS records. These records authenticate your emails, protect your domain against abuse, and ensure correct handling of bounces and feedback.
This guide describes:
What SPF, DKIM, DMARC and Return-Path are
Why they are required when using the MyLINK Email API
Which DNS records must be created
How MyLINK validates the configuration
Example DNS entries, including Cloudflare examples
Since DNS interfaces vary across providers, this guide focuses on required values only, not provider-specific steps.
1. Domain Verification in MyLINK Email API
When you add a domain to MyLINK for sending, the following checks are performed:
SPF Record
Your SPF record must include MyLINK as an authorized sender.
DKIM Record
The DKIM public key provided in MyLINK must be published.
Return-Path (Bounce Domain)
A bounce domain must be configured to enable correct bounce handling.
DMARC (Recommended)
DMARC helps protect your domain and enforces alignment between SPF/DKIM and the From-domain.
If any of these items are missing or invalid, the API will not authorize you to send emails from the domain, MyLINK will provide DNS information for configurating your domain.
2. SPF Configuration
SPF (Sender Policy Framework) identifies which systems may send email for your domain.
Required SPF entry for MyLINK:
include:mailmailmail.net
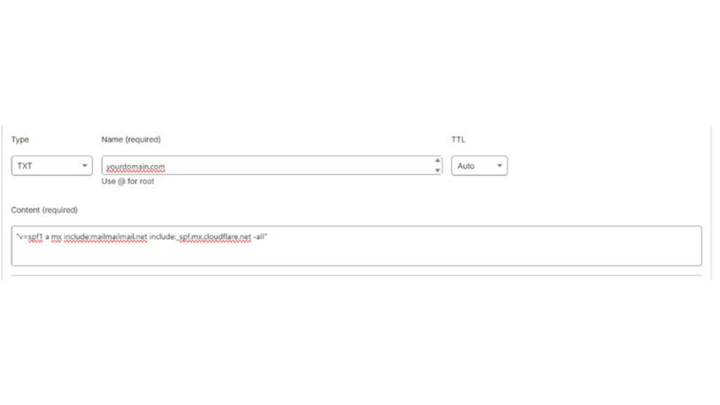
Example of a complete SPF record:
v=spf1 a mx include:mailmailmail.net -all
Explanation:
a authorizes the domain’s A-record host
mx authorizes the domain’s mail servers
include:mailmailmail.net authorizes LINK Mobility's infrastructure
-all Qualifiers (Policy)
-all (Fail): Reject the email (strongest).
~all (SoftFail): Accept but flag as suspicious (common default).
?all (Neutral): Take no action.
+all (Pass): Accept all (dangerous, avoid).
Publish SPF as a TXT record on the root domain, if your domain already has an SPF record, MyLINK entry should be added to the existing SPF.
If several systems send mail on behalf of your domain, ensure all are included.
3. DKIM Configuration
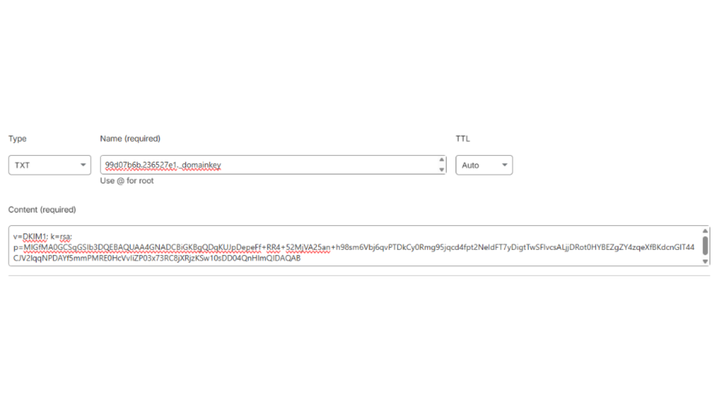
DKIM (DomainKeys Identified Mail) signs outgoing messages cryptographically.
MyLINK provides a DKIM selector and public key, which must be added as a TXT record.
Host / Name:
<selector>._domainkey.yourdomain.com
Value:
The DKIM public key shown in MyLINK.
Example:
v=DKIM1; k=rsa; p=MIGfMA0GCSqGSIb3DQEBA...
After publishing the record, MyLINK will automatically validate it.
4. Return-Path (Bounce Domain) Configuration
The Return-Path domain determines where bounce messages are routed.
MyLINK provides the required hostname, which must be set up as a CNAME.
Example:
CNAME
Host: us1.us2.yourdomain.com
Value: mailmailmail.net
(This is only an example; actual values appear in MyLINK.)
5. DMARC Configuration
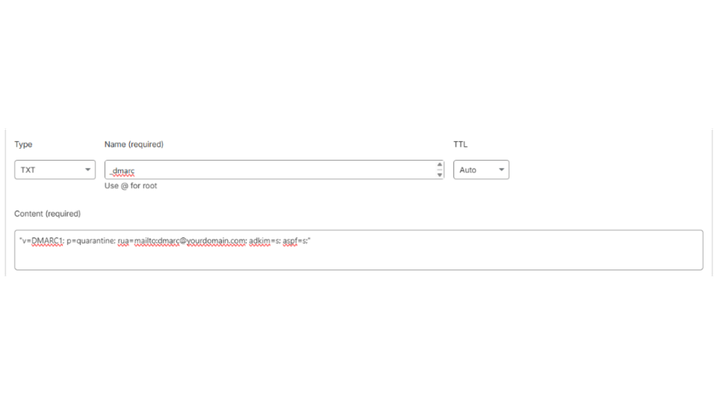
DMARC enforces alignment between the visible From-domain and SPF/DKIM authentication. It also enables reporting on domain usage.
Monitoring policy:
v=DMARC1; p=none; rua=mailto:dmarc@example.com;
Quarantine policy:
v=DMARC1; p=quarantine; rua=mailto:dmarc@example.com; adkim=s; aspf=s;
Reject policy:
v=DMARC1; p=reject; rua=mailto:dmarc@example.com; adkim=s; aspf=s;
Begin with p=none, then increase strictness once alignment is verified.
6. DNS Configuration Example (Cloudflare)
Below is an example of how DNS entries may appear in Cloudflare. Actual values depend on what MyLINK provides.
SPF
DKIM
Return-Path
DMARC
Cloudflare automatically omits quotation marks from TXT values.
7. What MyLINK Email API Validates
When all required records are valid, the domain is marked as ready for sending.
If assistance is needed interpreting which DNS values to publish, contact LINK Mobility Support. Configuration within the DNS provider must be handled by the domain administrator.